rabbitmq 惰性队列
发布时间:
更新时间:
🕒 阅读时间:4 min read
👀 阅读量:Loading...
一、创建惰性队列
1、官网说明
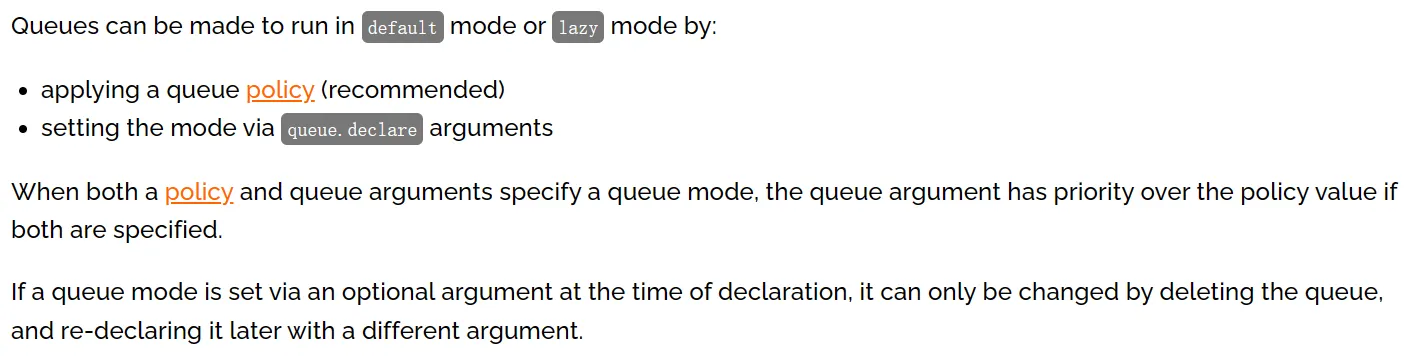
队列可以创建为默认或惰性模式,模式指定方式是:
- 使用队列策略(建议)
- 设置
queue.declare参数
如果策略和队列参数同时指定,那么队列参数有更高优先级。如果队列模式是在声明时通过可选参数指定的,那么只能通过删除队列再重新创建来修改。
2、基于策略方式设定
# 登录Docker容器docker exec -it rabbitmq /bin/bash
# 运行rabbitmqctl命令rabbitmqctl set_policy Lazy "^lazy-queue$" '{"queue-mode":"lazy"}' --apply-to queues
命令解读:
-
rabbitmqctl命令所在目录是:/opt/rabbitmq/sbin,该目录已配置到Path环境变量
-
set_policy是子命令,表示设置策略
-
Lazy是当前要设置的策略名称,是我们自己自定义的,不是系统定义的
-
“^lazy-queue$“是用正则表达式限定的队列名称,凡是名称符合这个正则表达式的队列都会应用这里的设置
-
’{“queue-mode”:“lazy”}‘是一个JSON格式的参数设置指定了队列的模式为”lazy”
-
–-apply-to参数指定该策略将应用于队列(queues)级别
-
命令执行后,所有名称符合正则表达式的队列都会应用指定策略,包括未来新创建的队列
如果需要修改队列模式可以执行如下命令(不必删除队列再重建):
rabbitmqctl set_policy Lazy "^lazy-queue$" '{"queue-mode":"default"}' --apply-to queues3、在声明队列时使用参数设定
- 参数名称:x-queue-mode
- 可用参数值:
- default
- lazy
- 不设置就是取值为default
Java代码原生API设置方式:
Map<String, Object> args = new HashMap<String, Object>();args.put("x-queue-mode", "lazy");channel.queueDeclare("myqueue", false, false, false, args);Java代码注解设置方式:
@Queue(value = QUEUE_NAME, durable = "true", autoDelete = "false", arguments = { @Argument(name = "x-queue-mode", value = "lazy")})二、实操演练
1、生产者端代码
①配置POM
    <parent>        <groupId>org.springframework.boot</groupId>        <artifactId>spring-boot-starter-parent</artifactId>        <version>3.1.5</version>    </parent>
    <dependencies>        <dependency>            <groupId>org.springframework.boot</groupId>            <artifactId>spring-boot-starter-amqp</artifactId>        </dependency>        <dependency>            <groupId>org.springframework.boot</groupId>            <artifactId>spring-boot-starter-test</artifactId>        </dependency>        <dependency>            <groupId>org.projectlombok</groupId>            <artifactId>lombok</artifactId>        </dependency>    </dependencies>
②配置YAML
spring: rabbitmq: host: 192.168.200.100 port: 5672 username: guest password: 123456 virtual-host: /③主启动类
package com.atguigu.mq;
import org.springframework.boot.SpringApplication;import org.springframework.boot.autoconfigure.SpringBootApplication;
@SpringBootApplicationpublic class RabbitMQLazyProducer {
    public static void main(String[] args) {        SpringApplication.run(RabbitMQLazyProducer.class, args);    }
}
④发送消息
package com.atguigu.mq.test;
import jakarta.annotation.Resource;import org.junit.jupiter.api.Test;import org.springframework.amqp.rabbit.core.RabbitTemplate;import org.springframework.boot.test.context.SpringBootTest;
@SpringBootTestpublic class RabbitMQTest {
    public static final String EXCHANGE_LAZY_NAME = "exchange.atguigu.lazy";    public static final String ROUTING_LAZY_KEY = "routing.key.atguigu.lazy";
    @Resource    private RabbitTemplate rabbitTemplate;
    @Test    public void testSendMessage() {        rabbitTemplate.convertAndSend(EXCHANGE_LAZY_NAME, ROUTING_LAZY_KEY, "I am a message for test lazy queue.");    }
}
2、消费者端代码
①配置POM
    <parent>        <groupId>org.springframework.boot</groupId>        <artifactId>spring-boot-starter-parent</artifactId>        <version>3.1.5</version>    </parent>
    <dependencies>        <dependency>            <groupId>org.springframework.boot</groupId>            <artifactId>spring-boot-starter-amqp</artifactId>        </dependency>        <dependency>            <groupId>org.springframework.boot</groupId>            <artifactId>spring-boot-starter-web</artifactId>        </dependency>        <dependency>            <groupId>org.projectlombok</groupId>            <artifactId>lombok</artifactId>        </dependency>    </dependencies>
②配置YAML
spring: rabbitmq: host: 192.168.200.100 port: 5672 username: guest password: 123456 virtual-host: /③主启动类
package com.atguigu.mq;
import org.springframework.boot.SpringApplication;import org.springframework.boot.autoconfigure.SpringBootApplication;
@SpringBootApplicationpublic class RabbitMQLazyConsumerMainType {
    public static void main(String[] args) {        SpringApplication.run(RabbitMQLazyConsumerMainType.class, args);    }
}
④监听器
package com.atguigu.mq.listener;
import com.rabbitmq.client.Channel;import lombok.extern.slf4j.Slf4j;import org.springframework.amqp.core.Message;import org.springframework.amqp.rabbit.annotation.*;import org.springframework.stereotype.Component;
@Component@Slf4jpublic class MyLazyMessageProcessor {
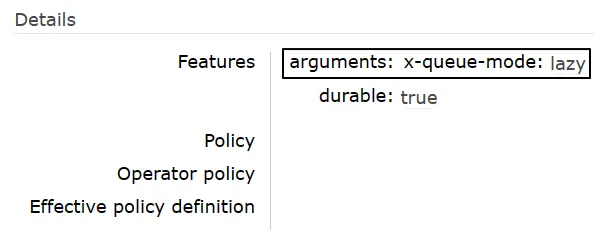
public static final String EXCHANGE_LAZY_NAME = "exchange.atguigu.lazy"; public static final String ROUTING_LAZY_KEY = "routing.key.atguigu.lazy"; public static final String QUEUE_LAZY_NAME = "queue.atguigu.lazy";
@RabbitListener(bindings = @QueueBinding( value = @Queue(value = QUEUE_LAZY_NAME, durable = "true", autoDelete = "false", arguments = { @Argument(name = "x-queue-mode", value = "lazy") }), exchange = @Exchange(value = EXCHANGE_LAZY_NAME, durable = "true", autoDelete = "false"), key = {ROUTING_LAZY_KEY} )) public void processMessageLazy(String data, Message message, Channel channel) { log.info("消费端接收到消息:" + data); }
}三、测试
-
先启动消费端
-
基于消费端@RabbitListener注解中的配置,自动创建了队列
- 发送消息
留言评论